web3-react is a popular react library for web3. However, it doesn’t seem to have a lot of documentation available. This blog posts will describe how to achieve some common functionalities with the v8 version of the Javascript library:
- Setup project with web3-react and Hardhat typescript
- Deploy a contract on a local node
- Read from contract
- Execute on contract
Project setup
The sub-projects were created with
// frontend
npx create-react-app frontend --template typescript
// MUI library for UI
yarn workspace frontend add @mui/material @emotion/react @emotion/styled @mui/icons-material

// contracts
git clone git@github.com:tonisives/typescript-solidity-dev-starter-kit.git
mv typescript-solidity-dev-starter-kit ./packages/contracts
Simple storage contract
The hardhat-starter-kit already contains a simple Counter.sol contract, that can be used to test web3-react. We will use the functions
function getCount() public view returns (uint256)
function countUp() public returns (uint256)
Start the node and frontend
In one shell, start the frontend
yarn workspace frontend startIn another, the hardhat node
yarn workspace contracts hardhat nodeAdd a Metamask connect button
web3-react can be used to add different chain connection options, like Metamask and WalletConnect. We will use Metamask for this project
Create a src/view/ConnectButton.tsx file in the frontend project
import { Button, Stack } from "@mui/material"
import { hooks, metamask } from "../model/config"

export const ConnectButton = () => {
  const { useAccount } = hooks

  const connect = async () => {
    await metamask
      .activate(31337)
      .catch((e: any) => {
        console.log(`activate error ${e.message}`)
      })
      .then(() => {})
  }

  return (
    <Stack width={"300px"}>
      <Button onClick={connect}>Connect</Button>
    </Stack>
  )
}
Add this component to the App.tsx file
function App() {
return (
<Stack pt={"20px"}>
<ConnectButton />
</Stack>
)
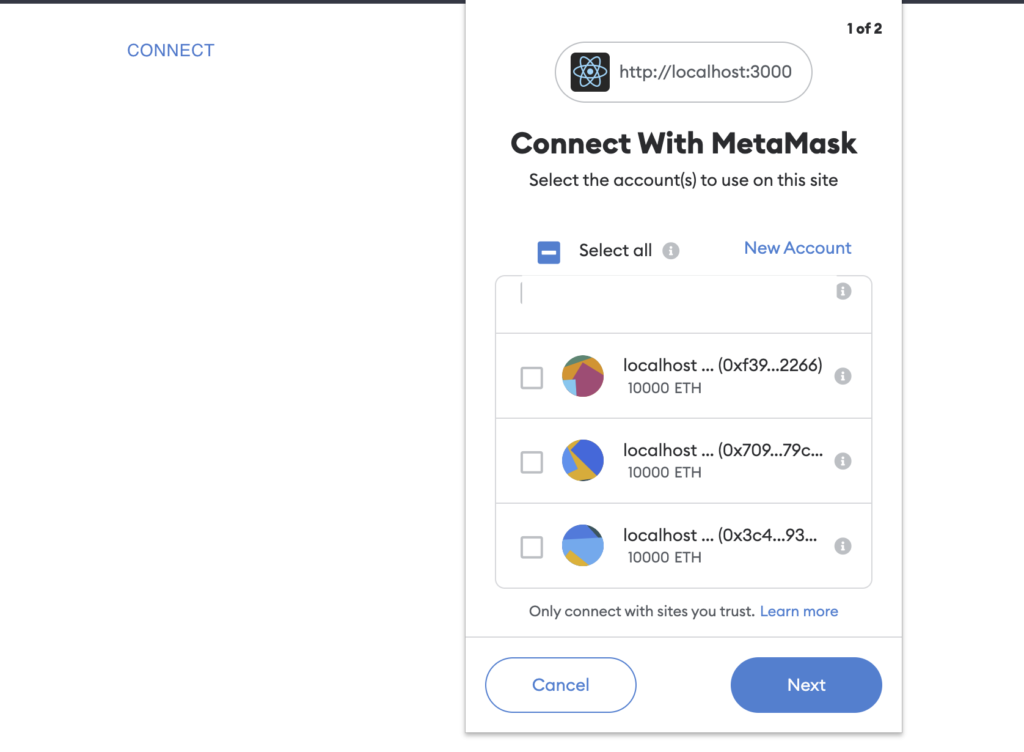
}When pressing the connect button, the Metamask will popup and prompt the user to connect to our site. Check out here to see how to connect to a different chain than the selected one.
The code will not work just yet, because we need to add the web3-react hooks first.
Add web3-react hooks
web3-react provides array of hooks that can be used by our frontend. These include
useAccount: () => string | undefined;
useIsActive: () => boolean;
useChainId: () => Web3ReactState['chainId'];
useAccounts: () => Web3ReactState['accounts'];
useIsActivating: () => Web3ReactState['activating'];
The hooks are initialised with initializeConnector function. Add this to src/model/config.ts file
import { initializeConnector } from "@web3-react/core"
import { MetaMask } from "@web3-react/metamask"

export const [metamask, hooks] = initializeConnector<MetaMask>(
  (actions: any) => new MetaMask({ actions, options: { silent: true } })
)
Finally, add the web3-react packages
yarn workspace frontend add @web3-react/core@beta @web3-react/metamask@betaNow, when pressing connect, the Metamask should popup
Similarly, connection can be established with WalletConnect, Network or any other provider. You just need to use the relevant package from @web3-react.
Read a value from the blockchain
We will read the uint256 count value from the Counter contract via the getCount() function.
Add the read button UI
Add the file view/ReadCount.tsx. It currently just shows the UI with a button and TextField
import { Button, Stack, TextField } from "@mui/material"
import { useState } from "react"

export const ReadCount = () => {
  const [count, setCount] = useState("0")
  const readCount = async () => {

  }
  return (
    <Stack direction={"row"}>
      <TextField label="count" value={count} />
      <Button onClick={readCount}>Read count</Button>
    </Stack>
  )
}
Render the ReadCount in App.tsx
<Stack p={"20px"} spacing={"30px"}>
  <ConnectButton />
  <ReadCount />
</Stack>
Now you can check if the new view is visible in the browser.
Create the contract object
To read from the local node, we need to initialise the Counter.sol ethers contract with
- ABI from the typechain types
- Address from the local node deployment
- Provider from the metamask chrome extension via web3-react
We create this contract with the ethers.js , to which we provide a signer via web3-react hooks
import { Counter__factory } from "../types/Counter__factory"
import { Contract } from "ethers"

const { useProvider } = hooks
const provider = useProvider()

const readCount = async () => {
    const counter = new Contract(
      "0x5FbDB2315678afecb367f032d93F642f64180aa3",
      Counter__factory.abi,
      provider?.getSigner()
    ) as Counter
You get the contract address from the terminal, after starting the hardhat node. It is deployed automatically by hardhat-deploy via packages/contracts/deploy/01-deploy-counter.ts
You get the Solidity types by copying the typechain-types folder from the contracts package
cp -r packages/contracts/typechain-types/ packages/frontend/src/We cast the Contract to the Counter type, which is a Typescript counterpart of the Solidity contract. This will add the correct types to Typescript and we can use auto-completion in vscode.
Read from the blockchain
Finally, we read the value from the contract and set the UI value.
const count = await counter.getCount()
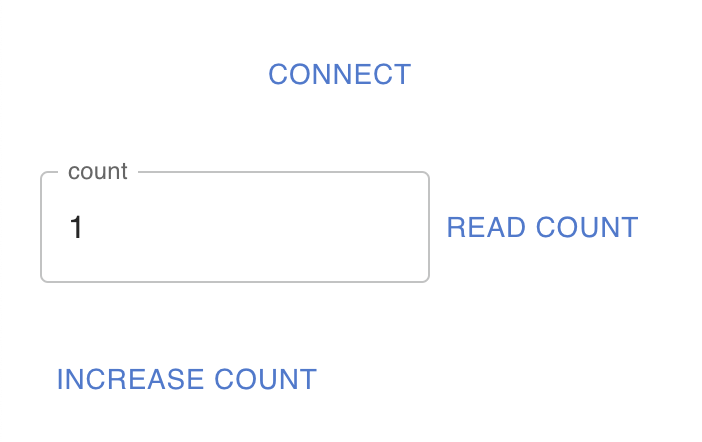
setCount(count.toString())Currently the value is 0, because we haven’t increased the count yet.
Execute a contract function
You can execute a contract function similarly to reading from it. You can use the same contract object. Just call the correct method
setLoading(true)
const tx = await counter.countUp()
Since the transaction takes time to be executed, you can wait for it with provider.once
if (!tx) return
provider!.once(tx.hash, (tx) => {
    setLoading(false)
})
Add this button to the UI in App.tsx
<Stack p={"20px"} spacing={"30px"}>
  <ConnectButton />
  <ReadCount />
  <IncreaseCount />
</Stack>
And press the button, it should popup Metamask for the countUp function.

Confirm the transaction and wait for the result, then press the read count button again, and it will be increased to 1.
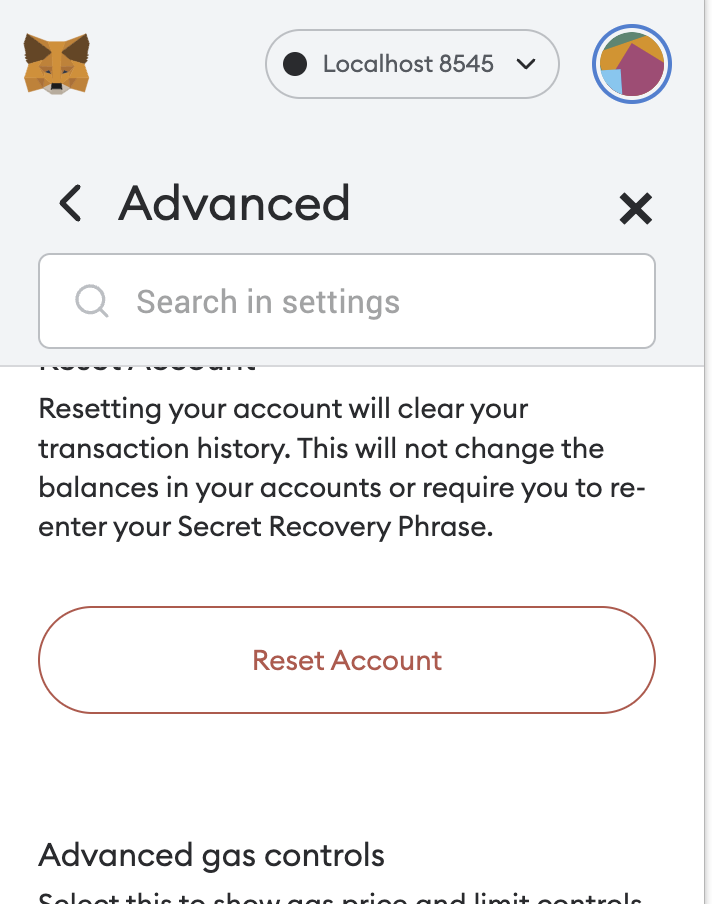
tip1: If you get random errors from hardhat node and have restarted it recently, then try to reset the Metamask account:
tip2: If in some views you only read from the contract, you don’t need to use the metamask signer. Instead, you can use a Network provider to an RPC like https://polygon-rpc.com. In this case, you need to initialise the web3-react hooks with the <Network> type. And use nwHooks in code.
export const [network, nwHooks] = initializeConnector<Network>(...Conclusion
web3-react is a nice web3 library to use in your crypto projects. It takes time to understand because of the lack of documentation, but once you get it, it is worth it. I especially like the small library size and dynamic imports. Also that it’s not related to any for-profit company, like react-moralis. Thank you Noah Zinsmeister.